Calendar and Events Introduction
The
calendar on your web site provides a personalised and up to date diary for each member - showing details of each event, contact information for the organiser, and even a map on how to get to the venue!
This guide explains how to manage the events in your calendar.
Creating a new Event
-
If you haven’t logged into the web site already, do so now. Click the Login link at the top of the home page and enter the login name and password as supplied.
-
Once you have successfully logged in, click the web office link at the top of the home page.
-
Select a user group folder associated with the event you are creating. For example if you are adding a youth meeting click on the Youth group folder. Alternatively you may create an area specifically for storing all your events and then sub-divide that into different event categories. Because this second method isn't based on groups that have a membership associated with them, however, you won't therefore be able to display events only to a select group of people.
-
Select the Events tab to display the calendar.
Events tab not available? This will either be because you have
not selected a
user group (user groups are the yellow circles) or because you don't have the necessary permission to publish events in this group. Contact your site administrator to grant you the Events
Web Office permission to you for the area of the site you require it within.
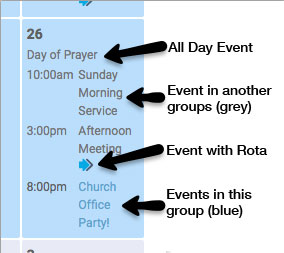
By default, every event taking place which you have permission to edit will be displayed. Those events that do not belong to your current group are “greyed out” as illustrated below:
 Today’s date
 is highlighted with an orange box. If you wish to see only those events which belong to your group click the
show selector at the top of the calendar and select
events for this group only.
-
Locate the date when you wish to add a new event; use the
 and
and  buttons to move backwards or forwards one month at a time, or use the jump to selector to move directly to a particular month.
-
Click the add button on the appropriate date. The event details window will be displayed shortly afterwards.
-
Enter a title, details, a location name and, if available, the postcode where the event will be held (note: you must supply a valid postcode in order to provide a location map).
Note:If your postcode doesn't accurately reflect the location of the event on the map you can manually plot the location on the map using the Set map directly link.
-
If necessary click the select button to change the event contact or remove to display no contact for the event.
-
By default the start and end dates will contain the date on which you selected the add button. If either of these are incorrect enter a new date now; use the
 button if required to select a date using the interactive calendar.
-
Enter the start and end time of your event or tick the all day event option if appropriate. If this event occurs regularly you may also wish to use the recurring event option to enter a number of events in a single process:
-
Use the occurs every selector to choose how frequently the event takes place. If required, select a day when event reoccurs (by default this will be the day when the first event takes place).
-
Finally select the date on which the final event in the series takes place.
Note: If some of the events in the series take place on a different date, or have a different location you can edit the details of each event individually once the series has been created.
Note 2: You won't be able to make a single event into a recurring event after the initial event is created. You will need to tick the 'recurring event' box when making the first event if you are wanting a series of events.
-
Click the select button, next to the Extra link label, to link the event to an existing article or group if necessary.
-
Use the access permissions selector to restrict who can see details of the event. See Publishing security guide for more details about the access permission options.
-
Click the OK button to complete the process. The events view will be updated to show the new event.
Editing an Existing Event
You can edit the details of an existing event as follows:
-
Display the events view using the method described above.
-
Click on the title of the event you wish to edit; if the title is “greyed out” the event is located in another group and the Web Office will jump to that group in order to enable the editing facilities.
-
The event details window will be displayed; edit the details of your event as described in the previous section.
-
If this event is part of a recurring series click the apply changes to all events if required.
-
Finally, click the OK button to commit your changes and return to the events view.
Event Rotas
The

symbol after a title in the events view indicates that rota duties are associated with this event. Click on the symbol to display the event rota – a list of people performing tasks at this event.
 Tips
Tips
-
It's important to think about who is the event relevant to? You should restrict an event's visibility to group's members only if they are the only people who will be interested in the event. This will keep user's calendars more personalised and therefore less cluttered.