Children in Hubb
Your Hubb system can help you manage the details for all the children in your database, and fulfil your safeguarding obligations.
Hubb has always handled children just the same as adult users - they have a normal user profile, with all the same custom field options and the same feature set. However, in some cases it is useful to have specific features for handling children's records, and so we've added a collection of features to help make common tasks as simple as possible.
You can now:
-
Store sensitive child information securely
-
Provide secure access to only those in your church who require it
-
A secure Check-in system so that guardians can self-manage their children’s registration each week, new families can self-register, and your children’s leaders can then use the group management tools to reprint labels, log incidents and contact the guardians in an emergency
-
Gain and manage Consent
-
Easily email children’s guardians
-
Easily share documents and photos securely only with guardians of each children’s group
Getting Started
If you don’t have any children in your database yet, now is a great time to get started! We recommend doing things in this order:
|
lock_outline |
1. Ensure only authorised people can access members at the top level of your site
more info... |
|
|
By default, new children that you add will be placed in the top level folder of your site. So for security, before adding any child records, consider:
-
Checking group permissions on the top level folder and remove anyone who should not have "Membership Manager" or "Edit Members" permissions. Tip: In some cases you may be able to remove permissions for someone from the top level folder, and just give them those permissions on their own group folder lower down the group tree.
-
Ticking the Apply group membership permissions in the user picker option for the top level group under Group Settings > Advanced > Web-Office User Picker. This will prevent people who have Membership Manager permission only on a lower group from adding children to their group in order to view their details.
|
|
person_add |
2. Add new records for children to their existing families, and check guardian mobile number, child DOB, age categories and family ordering
more info... |
|
|
Add new child record(s):
-
Open a user profile from the family to which the new child belongs (use the Quick Find or Membership tab filter)
-
Switch to the Family page by clicking the Family drop-down and selecting the first item
-
Click Tasks > Add a new member to this family
-
Complete the new user wizard, being sure to enter date of birth for the child and set their age category to Child / Youth
If you have lots of children to import, see this information about importing new records in bulk.
Check family is setup correctly:
-
Ensure children have a date of birth set
-
Ensure all family members have the correct age category set, or turn on Age Category Auto Sync in Site Settings > Users > Age Categories
-
Ensure all guardians have an email address and mobile number
-
On the family page, ensure the adults are listed as the first family members in the family ordering section
|
|
create_new_folder |
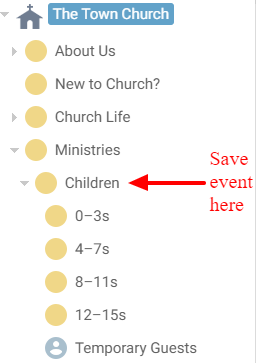
3. Create a group structure that matches your children’s work
more info... |
|
|
For use with Check-in, you should create group folders to match the age groups that your children's work is divided into (although this could just be one group for 0-17 year olds). In most cases, it should probably look something like this:
 |
|
folder_shared |
4. Add children into the correct groups using Query
more info... |
|
|
For each age group:
-
Click Query
-
Ensure the top level folder is selected and click

-
Add a new Criteria and select date of birth from the drop-down list
-
Select "is" and "after" and enter the earliest date of birth a child should have to be in the group
-
Add a new Criteria and select date of birth from the drop-down list
-
Select "is" and "before" and enter the latest date of birth a child should have to be in the group
-
Click Run
-
If you are happy with the results list, click Tasks > Group & Site Membership & Permissions > Grant Group Memberships
-
Choose the group from the tree and click OK
|
|
done_all |
5. Create your Children’s GDPR Consent questions if required
more info... |
|
|
See information about GDPR in general and specifically about setting up consent questions.
Note: Consent questions for children are currently always mandatory for the guardian to tick during Check-in. For more information see this article. If you wish to have more options, consider using Custom Fields instead. |
|
event |
6. Create a recurring event for your Children’s work
more info... |
|
|
See creating events. |
Additional Tasks
|
mail_outline |
Email guardians of children in a particular group
more info... |
|
|
To do this:
-
Begin a new Mailing
-
On the Select Groups step, choose the children's group and select one of the Substitute Children options:
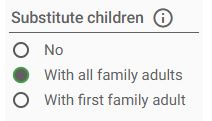 ?
-
Click Next
-
The mailing wizard will now substitute all children with their guardians
-
If you see an orange warning banner on the next page, you should deal with those first and then restart the mailing:
-
If no errors are shown, you can continue the mailing wizard as usual.
|
|
lock_outline |
Create a secure group for guardians to view documents and photos
more info... |
|
|
-
Go to the Members tab of the source group
-
Click Tasks > Account Management > Related groups
-
Add a destination group, making sure to tick Replace children with adults
|
|
done_all |
Email guardians of children that have had a particular consent given on their behalf
more info... |
|
|
-
Go to Query and create a new Query
-
Add a new criteria and select the required Consent Question(s) and specify the state
-
Run the query
-
Click Tasks > Family Actions > Re-run the query replacing all children with all family adults
-
From the results page, click Tasks > Mailing & Consent > Send Mailing
|
|
sync |
Turn on Age Category Auto-sync
more info... |
|
|
-
Go to Site Settings > Users > Age Categories
-
Tick Enable automatic syncing of age category for people with a date of birth set
|
|
supervisor_account |
Set adult age for site
more info... |
|
|
-
Go to Site Settings > Users > Age Categories
-
Select your preferred adult age from the drop down list
|
For any questions and help, please
contact us.