Shop Order Processing
Once your shop is live to the public you will need to begin processing orders, shipping goods and processing payments. This article describes the steps that should be taken to process a shop order.
Processing New Orders
NB. Payment will be taken immediately on digital orders so will require no processing. Digital only orders are listed under the Digital Only heading in the navigation pane on the left-hand side of the Shop area in the Web Office.
Process new orders with physical products as follows:
-
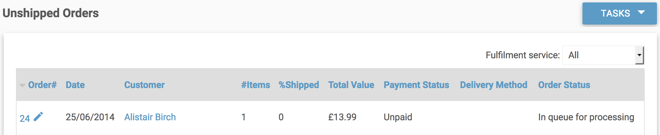
Select the Shop tab on the task pane of the Web Office and a list of any unshipped orders will be displayed in the work pane shortly afterwards as displayed below:
-
Click on the order number or the
 button for the order you wish to process. The details of the order will be displayed in the work pane.
-
If you are unable to fulfil this order immediately you may wish to set the order's status option to “Awaiting Stock” or something similar. You can, if you wish, enter your own text in the appropriate Notes field to give more details to the customer.
If you are able to fulfil this order immediately you should take the following actions:
-
Step 1 – confirm payment – click the Full Payment button. Once the process is complete the Payment Status will change to Totally paid.
No money is taken from the customer credit card until the Take Full Payment button is pressed unless you are using PayPal for online payment processing, in which case this step is taken automatically when the customer places the order.
-
Step 2 – change the order status – update the order status to indicate to the customer the progress of their order. If required you can enter your own text in the appropriate Notes field to give more details to the customer. This status information is available to the customer in the My Orders section of the web site.
-
Step 3 – update order details – in the Lines area of the order enter the quantity of each item which has been shipped. In most cases this will be the same number of items as the number ordered – if all items are being shipped, used the shortcut button Ship Remaining Items.
Click Save to commit your changes. If all lines on the order have been shipped the order will move to the Fully Shipped category, if only some of the lines have been shipped then it'll move to Partially Shipped.
-
Step 4 - Send confirmation - Finally you may wish to send a confirmation to the customer informing them their item has been despatched. This can be done via the Tasks Button
 and selecting the Send a confirmation e-mail, and move the order into the Order Archive task.