Article Forms
Forms are useful for capturing feedback from your site visitors, as a booking form and as a way users can email you a question. Note: Online booking that involves taking payment online should be done through the payment group application. Forms that collect user information that you want to be made into database users should use a profile editor.
Creating an Article Form
-
Step 1 - Create an article
To create a form begin by creating an article as explained step-by-step in the articles guide.
-
Step 2 – add form fields to your article
Add any introduction text to your form in the contents view.
When you've added your introduction text, click in the contents pane where you wish to begin adding the form fields you require. Expand the form options by clicking on the form button on the toolbar, choose the type of field that's appropriate for the information you wish to capture from the available options'.
Here's a description of what each form toolbar button does in the document editor:
Note: You won't be able to publish a form until it has a send button added.
Click on the relevant form toolbar icons to add them to the page.
-
Most importantly, test every form as soon as you publish it and check the results in the web office. If the 'name' is missed from any field then the results will not be saved and you will lose the information people are submitting. When testing forms with multiple options, choose all the options, this will set the order the columns are generated in the web office. If you are wanting an option to be mandatory please test that you can't submit the form until this is filled in.
-
Step 2 – set the form properties – select the properties tab and configure the options as required. The options common with all articles are described in the articles guide. Some additional options are added for forms to the properties tab. These are described below:
|
Form Response Notifications |
All form responses are saved in the Web Office. Optionally you can also receive notification of responses by email.
These notifications can be configured on the group's Summary tab, under "Jobs", you can read more about this in this article about email notifications. |
|
Form Response Message |
Upon submitting a form users are directed to a page displaying a message saying their response has been saved. To configure this message enter the text here. |
|
Form User Redirection After Completion |
Set where the user is re-directed to after reading the response message.
By default they are retuned to the group homepage.
|
-
Step 3 – publish the form! - As with standard articles, once you are happy with the content of your form set the publishing status via the options menu (the three dots to the right of the article name) to published. NOW TEST YOUR FORM! Fill in all the fields as this will set the order of the form responses in the web office.
Click the save button to commit your changes and return to the documents view.
 Making Fields Mandatory
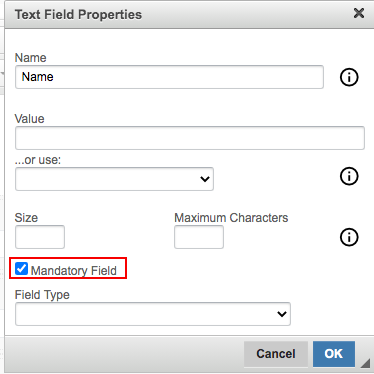
There is a tick box on fields to make the response mandatory, you can also add the code  into the source code to make other fields mandatory.
Viewing Form Responses
Form responses are captured in 2 different ways:
-
All form responses are stored in the Web Office for viewing and export.
-
You can add notifications to your group to email the form response to the users you specify. There are instructions on setting up notifications here.
When a new form response is submitted the

symbol will appear after the group name in the
Site Manager navigation.
Review and deal with the responses as follows:
-
Select the group folder the
 symbol appears next to, which is the same area the form was published in.
-
Select the documents tab.
-
Next to the document title there will be an icon showing the number of form responses on this article. The icon will be red
 if there are any new responses, or orange
  if all the responses have been dealt with.
-
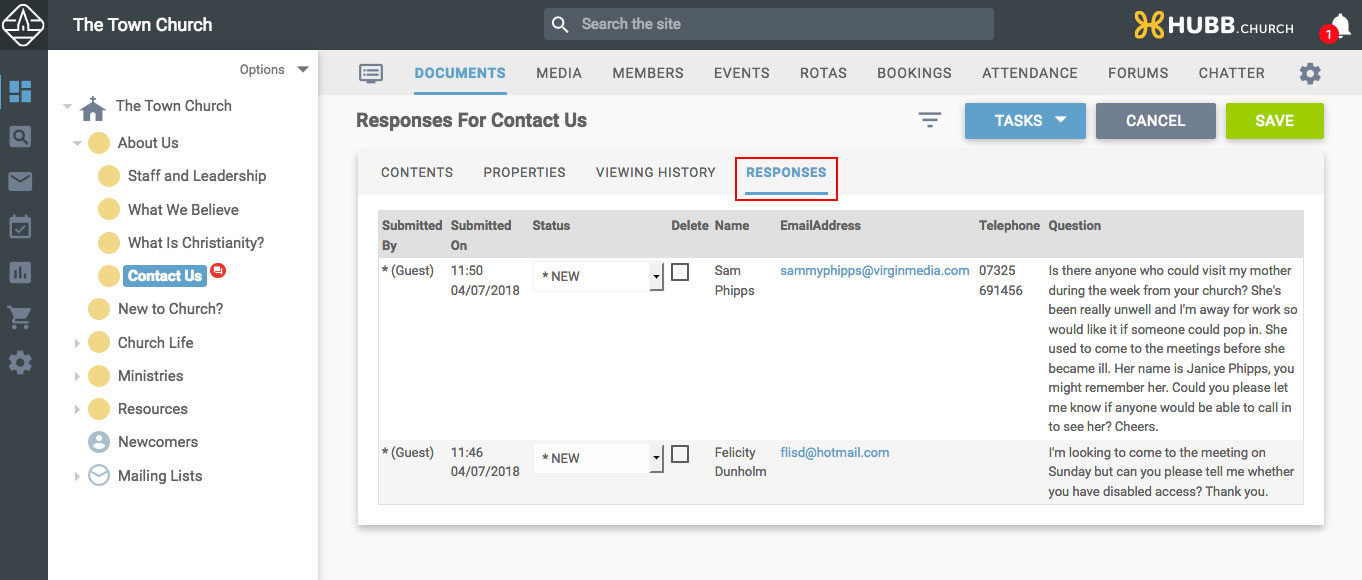
Open the article and there is a tab for 'Responses' along the top. Click on this to view the responses you've received.

-
Review the response and change its status to one of the options supplied in the drop-down.
-
If you wish to export the information select the required format from the list of tasks shown under the task button on the top right.
-
If you would like to delete the response(s), check the box of the responses you wish to remove.
-
When you've reviewed the responses, set the status as required and selected any responses you wish to remove, click save to commit your changes.
Please see these further articles for
adding tick boxes or
adding radio buttons or
adding selection fields to a form, and this video on
making sure your form is responsive so that it resizes depending on the device it is being viewed on.
 Tips
Tips
-
A form can be used for web site visitors to contact your organisation without you publishing your email address. This will help to reduce the spam email you receive.
-
To ensure all information has been retained you must make sure you have a name in the first field in the pop up when creating each field. Without this the information will not be saved. You cannot retrieve information that has been submitted in a form field without a name.
-
Although form responses can be exported as a CSV file and imported into a group to create user accounts this will create a duplicate account (if the user already exists in your database) and is also time consuming. To allow logged in users to register their interest in a group use the Join a group component or use the profile editor component to capture information on their user profile.