Group Membership Management
Users who have been added to your contact database can then be granted membership of user groups. This guide explains the different methods available to grant a user membership of the appropriate groups.
Benefits of group membership
Keeping your group memberships up-to-date will provide the following benefits:
-
Make content visible to its group members only, enabling private content to be hidden securely and only content of interest to each user to be displayed.
-
Use organisation management features such as Mailing, so you can quickly email all the people in a certain group.
-
Reports can be accessed at a group level such as viewing the demographic of a particular group of people within your organisation.
Adding members to groups
Members can be added to groups in the following 4 ways:
-
Specific Group – The membership of a specific group can be managed through the members area of any user group folder. This method can be used by group leaders to manage their group memberships.
-
Specific Individual – A site administrator can manage the group memberships of a specific individual through the user record involvement tab.
-
Self-management – The My Memberships section of My Area enables users to apply for membership of certain groups helping to make sure they are a member of the desired groups.
-
Running a query in the web office to find a selection of users based on a certain criteria and then enabling their membership of a certain group following that query. See this article on querying for more information.
Lets take a look in more detail at each of these methods.
Managing the membership of a group
Adding users to a group
Several users can be
added to a specific groups by following these instructions:
-
If you haven’t logged into the website already, do so now. Click the Login link (normally located near the top of the home page) and enter the login name and password as supplied. Once you have successfully logged in click the web office link.
-
Select the user group that you wish to modify the membership of.
-
Select the members tab, the group's members will be displayed shortly afterwards.
Members tab not available? If the members tab is disabled it's either because you haven't selected a user group folder or because you don't has the Membership Manager permission required to manage the membership of groups. Contact your site administrator to request the appropriate permissions.
-
Select blue 'add' icon
 at the bottom right of the page. The user record browser window should be displayed shortly afterwards.
-
Select the appropriate people from the list by clicking on their names; as you select them they will appear on the right-hand side as Selected. When you've selected all the people you wish to click the Select Records button; the user record browser window will close and the members listing should update to display the user(s) you've added.
Removing users from a group
Follow these instructions to remove a user from a group:

-
Follow the instructions above to enter the members area of the required group.
-
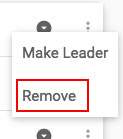
Select the Quick Options menu (three dots) from the far right of the member you wish to delete. Click on 'Remove'.
-
A message will be displayed asking if you are sure you wish to delete the selected user. Click OK to proceed with deleting the user; the Group members listing will refresh and the user you deleted will no longer be a member of the group.
You can also
remove users in bulk by running a query to find all the users in the group you want to delete and selecting the options to under 'Group & Site Memberships & Permissions' to revoke group memberships of that group. See
this article on querying for more information.
Group Leaders
You can separate the display of group members from the leaders of a particular group by clicking on the arrow icon to the right of the appropriate user. The benefits of making someone a leader of a group are:
-
Can be used as a filter in the mailing feature enabling you to email only the leaders of groups and can also be added as criteria or displayed in the Query feature.
-
Used in generating the group leaders report located within the Reports area.
Managing an individual's group memberships
You can add and remove an individual user from several groups across your site in one operation as follows:
-
Login and enter the Web Office.
-
Open the user record that you wish to modify the membership of; this can be achieved in either of the following 2 ways:
-
Quick Find search - Using this feature located in the bottom left-hand corner of the Web office to locate and open the required user record quickly. For help on using the Quick Find feature see
-
Members tab - Select the members tab and click on the users name to display their details.
-
Select the Involvement tab from within the user record window; a group structure displaying the user's group membership will be displayed shortly afterwards.
-
Click on the green Edit button on the top right.
-
The checkbox will be enabled for all the groups you have permission to assign memberships to. Check the appropriate boxes to add the user to a group and uncheck the boxes from the groups they are to be removed from.
-
Click Save at the top of the page to commit your changes.
My Membership
Each user can edit their group memberships themselves within the
my membership area as follows:
-
Login to the site.
-
Move your cursor over the my area option on the drop-down navigation menu until more options are revealed including the my involvement option..
-
Move your cursor over the my involvement option to display further options and click on the my membership option to select it; shortly afterwards the My Membership page will be displayed.
-
Click on the checkbox to the left of any groups that you should be a member of.
Can't select a particular group? It's possible for sites to set certain groups to be unselectable, indicated by the checkbox being disabled. For more information on this see the Group Application article in the knowledgebase.
The group is already selected but I can't deselect it? Groups that you are already a member of will appear selected. It's not possible to remove yourself from a group. If you believe you are no longer a member of a particular group you should contact the group membership manager.
-
Click the Update button at the bottom of the page to commit your membership applications.
Note: Selecting groups on the my membership page doesn't necessarily make the user a member of those groups they have selected. Each application will need to be approved by the membership manager of those groups unless the site has specifically been set up to automatically approve membership applications. To find out more about this read the Group Application article.
Using the my membership page empowers your users to help the group membership manager keep their group membership up-to-date. If you don't wish to use this facility the my membership option can be hidden from the menu by deselecting the option within the drop-down menu component settings in the layout editor. For more details on how to do this see how do I remove options from the drop-down navigation menu.
Approving membership applications
If a user has applied to be a member of a particular group on your website then normally* their application will need to be approved. Applications to groups can be approved as follows:
-
Login and enter the Web Office.
-
In the Site Manager navigation on the left-hand side of the Web Office any applications to groups that the logged in user has permission to approve will be indicated by a
 symbol next to the group name. The group name will also appear in bold and will always be displayed, so there's no need to display groups deeper in the folder structure.
-
Select the group that you wish to approve memberships for.
Tip: Select a group deep in the group structure first because approving the application here will approve applications higher up the group structure; see the Membership Golden Rule below for a more detailed explanation of this.
-
Once you have selected a group select the members tab, click on the filter to ensure the applicants are displayed.

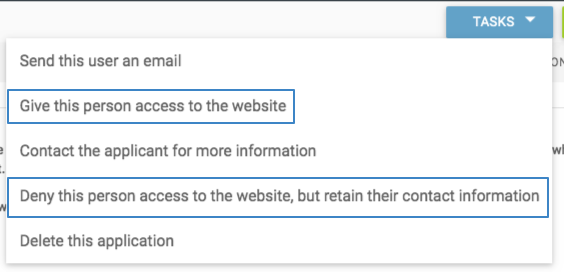
Click on the quick options menu to the far right of an applicant's name and select the option to 'Review Application'. 
If you are
wanting this person to have a login you can select the option to 'Give this person access to the website'. You can then set their membership and involvement settings and if the person has an email address they will be sent a welcome email with login information and a link to set their password.
If you
don't want the person to have a login, for example, they are just registering so they can receive your newsletter emails, you can select the option to 'Deny this person access to the website, but retain their contact details'. You will then have the option to send them an email explaining that they have been added to the site, and will be on your mailing list.
Membership Golden Rule
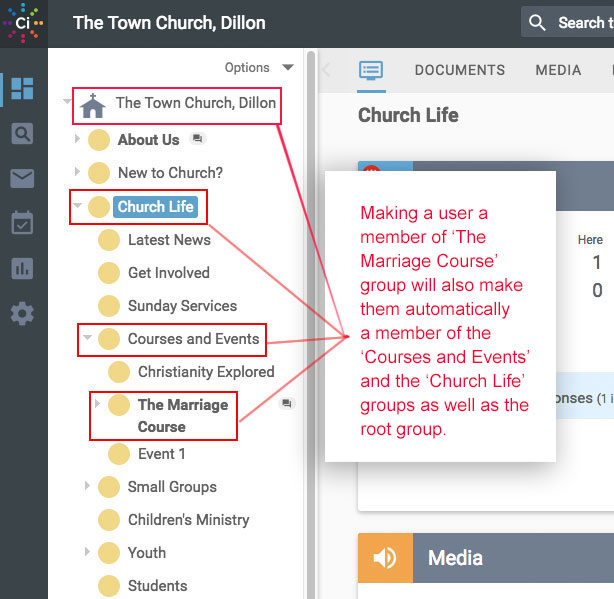
If you've followed any of the above methods to add people to groups you may have noticed that whilst selecting some groups other groups were also automatically selected. This occurs when a group is selected that has a parent group. A parent group is the group immediately above the current group in the structure and any sub groups are called its children.
If a user is added to a group then the user will also be added to its parent group, if it exists. The user will also be added to the grand parent group (the parents parent) and so on up the branch of the group structure. In the example below if a user is made a member of the 'The Marriage Course' group they will also become a member of the 'Courses and Events' and 'Church Life' groups.

Users are automatically added to groups they must logically be a member of based on the groups they have been added to. This makes it easier to maintain the correct group membership for an individual.
 Tips
Tips
-
When initially adding users to the appropriate groups on your site, add them to the lowest groups in the structure first. This will add them automatically to the parent, grand parent groups and so on, higher up the structure (see Membership Golden rule above) therefore saving you time.
-
Users can also be granted group memberships en masse from a query selection. This could be used to select a specific group of people on your site to form a new group e.g. all the males aged 30-50, or to make every member of one group a member of another group. For more details on the Query tool see the Querying introduction article.